
Decorating eggs is a festive activity that celebrates the arrival of spring, a time of renewal. An ancient symbol of rebirth and new life, the egg has a long and storied history linked to holidays and seasonal celebrations around the world, including Easter. If you’ve hand colored eggs, you may have unwittingly participated in one of the oldest known decorative art forms. In 2010, archaeologists in South Africa discovered engraved ostrich eggs dating back around 60,000 years. Since then, eggs have been decorated in every possible way, including traditional pysanky (Ukrainian Easter egg decoration) and handicraft-inspired decoupage eggs.
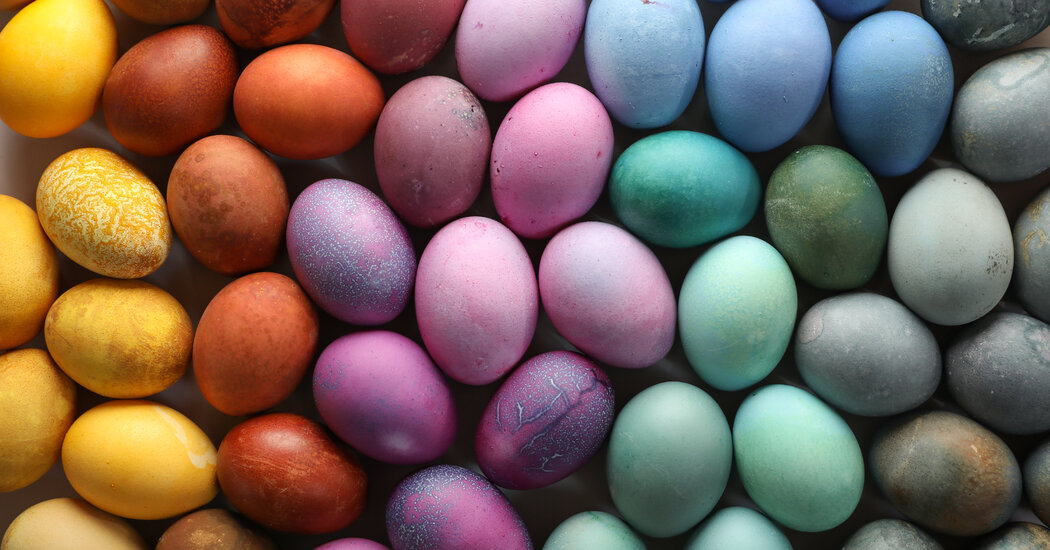
This tutorial keeps things simple and is based on natural ingredients that result in rich, jewel-colored dyes that cover the egg in color but also let the mottled beauty of the shell shine through. The color recipes used here take inspiration from the spring color palette – from robin egg blue to daffodil yellow – and require just a few kitchen ingredients and a little patience.
These dyes do not act as quickly as their commercial counterparts. The eggs must soak for at least a few hours. To get the bright colors shown here, you’ll need to soak your eggs overnight. If you prefer more pastel shades, a shorter soak is effective. Remember, this is not an exact science. The colors vary widely depending on a number of factors, including the color of the eggshells and the time you soak them for.
materials
Natural coloring ingredients such as
-
3 cups of yellow onion skins made from about 8-10 onions
-
3 cups red cabbage, roughly chopped
-
3 tablespoons of ground turmeric
-
3 cups of beets, chopped
-
3 cups of frozen blueberries
-
3 tablespoons of hibiscus loose leaf tea
1.5 liters of water per dye component
12 tablespoons of white vinegar
2 dozen white or brown eggs, or both, hard-boiled
To create a dye bath, combine a single natural dye ingredient (listed above) with one and a half gallons of water in a saucepan. Bring to a boil over high heat. Once the water boils, turn the heat on low and simmer for about 30 minutes. Remove the pan from the heat and let the mixture cool before adding the liquid to a large glass or bowl. Avoid using stoneware as the dye can stain. Compost or discard the solids. Stir two teaspoons of white vinegar into the dye.
Repeat these instructions for each dye ingredient in separate pots or use the same pot that has been thoroughly washed after each preparation.
To color the eggs, put a single layer of hard-boiled eggs in a glass or casserole dish and pour the dye over them until completely submerged. Let the eggs soak for two to three hours for soft pastel colors. For vibrant, stronger colors, place the egg dye bath in the refrigerator and soak overnight. You can experiment with the vibrancy of the dye by giving the eggs multiple soaks in the dye. However, be sure to dry them off between soaks. You can also dip the eggs in different baths for different colors. The purple eggs resulted from coloring the eggs in the beet dye and later in the cabbage dye.
The best way to remove the eggs from the dye is to use a slotted spoon. The key is to carefully remove them and let them dry completely before handling them. The dye may rub off or streak if you handle or wash the eggs before they are dry. Use a cooling shelf or an empty egg carton to dry.
As long as the eggs are properly refrigerated and stored in accordance with food safety guidelines, they are perfectly safe to eat for up to a week and the colorings do not leave any noticeable taste.
Comments are closed.